
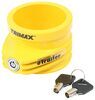
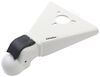
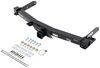
Air Lift 1000 Air Helper Springs for Coil Springs - Rear
(1090 reviews)
Price: $122.14
Air Lift 1000 Air Helper Springs for Coil Springs - Rear
Item # AL60807
Retail:$197.07
Our Price: $122.14
You Save: $74.93
Will this fit?
To see if this custom-fit item will work for you please tell us what vehicle you'll use it with.

Need help with installation?
Locate installers near me- All Info
- Reviews (1090)
- Q & A (0)
- Videos (1)
- Photos
Air Lift Vehicle Suspension - AL60807
- Air Springs
- Rear Axle Suspension Enhancement
- Light Duty
- Air Lift
1,000-lb Capacity. Upgrade your vehicle's rear coil spring suspension with this kit. Molded polyurethane air springs fit inside your existing coil springs for added support when hauling heavy loads. Improves handling, braking, and overall ride.
Features:
- Provides 1,000 lbs of load-leveling support to improve safety and ride quality
- Supports your existing rear coil spring suspension when you're hauling or towing
- Keeps your vehicle level when you are hauling a heavy load
- Improves steering and braking performance and maintains headlight aim
- Reduces tire wear and OEM suspension strain
- Diminishes sway and absorbs road shock to improve stability and ride quality
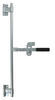
- Lets you manually adjust air pressure for even load distribution and support
- Inflate each spring independently to level off-center loads (with installation of dual air lines)
- Constructed of durable, molded polyurethane
- Installs inside your vehicle's rear coil spring suspension
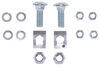
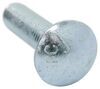
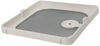
- Includes 2 air springs, 2 heat shields, tubing, Schrader valves, and hardware
- Add a compressor system (sold separately) to monitor and adjust air pressure
- Made in the USA
Specs:
- Load-leveling capacity: up to 1,000 lbs
- AirLift 1000 springs will not increase your vehicle's weight-carrying capacity. Do not exceed the manufacturer's recommended weight limit.
- Adjustable air pressure: 5 psi - 35 psi
- Lifetime warranty
- 60-Day satisfaction guarantee
Heavy loads can cause the back of your vehicle to sag and add unnecessary stress to your suspension. This stress not only affects your brakes in a bad way, but your tires, headlight aim and handling suffer as well. To improve your vehicle's ability to endure heavy loads, you need to add support to your existing coil springs.
Air Lift's AirLift 1000 adjustable air springs have 1,000 pounds of load-leveling capacity and are made specifically to fit inside your rear coil spring suspension for additional load assistance. You can inflate and deflate these tough, molded polyurethane helper springs as needed, ensuring the perfect amount of support for every load, every time. Easily level your vehicle front to rear, and if you run dual air lines to the air springs at installation, then you can inflate the springs independently of one another for side-to-side leveling. AirLift 1000 is a breeze to install with standard tools and comes with an easy-to-follow instruction manual.
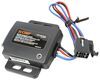
AirLift 1000 comes with manual inflation valves that are typically mounted on the bumper but can be installed anywhere on your vehicle for easy access. For even more convenience and control, you can add a compressor and gauge system (sold separately), which will let you monitor and automatically inflate your air springs.
Air Lift kits are designed to keep your vehicle at normal ride height. You can find the normal ride height of your vehicle by unloading it and measuring the distance between the bottom edge of your wheel well and the center of the hub. After you find and record this distance, you can regulate the amount of air that you put into your air springs to maintain normal ride height - even when you are hauling a heavy load. You will need to adjust the air pressure in your air bags according to the size of your load.
Air Lift is positive that you will benefit from their air spring suspension system - so much so that they offer a 60-day satisfaction guarantee. Install and use AirLift 1000 springs for 60 days, and if you are not satisfied at the end of this time, you can remove them from your vehicle and return them for a full product refund.
60807 Air Lift 1000 Air Bag Suspension Support System for Coil Springs - Back
Installation Details
This Product Fits The Following Vehicles
- 2004 - 2004 Nissan Pathfinder Armada
California residents: click here


Video of Air Lift 1000 Air Helper Springs for Coil Springs - Rear

Videos are provided as a guide only. Refer to manufacturer installation instructions and specs for complete information.

Video Transcript for Air Lift AirLift 1000 Air Helper Springs Review
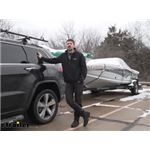
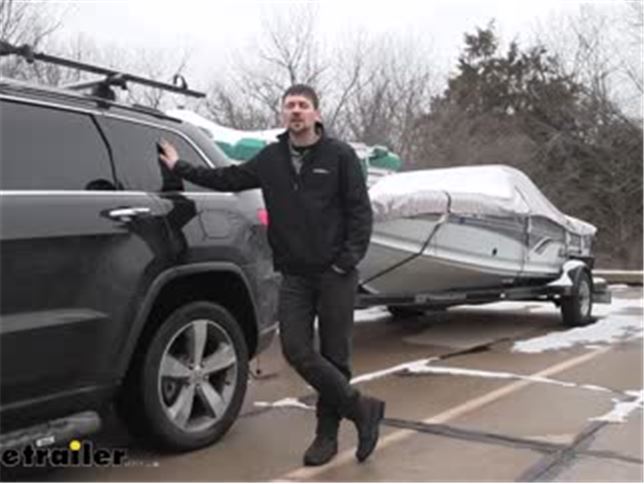
Connor: Hey guys, how's it going Connor, today, here at etrailer.com. We're going to be taking a look at the Air Lift 1000 Air Helper Springs. In order to give you a better idea of the benefits that our airbags are going to offer here for our vehicle, what we're going to do is, we're going to take some measurements. We're going to measure the stock suspension unloaded from the ground to the center of the wheel well here. Then we're going to hook up a trailer.We have a medium to small boat trailer here, which would be perfect for this Grand Cherokee that we have in particular. We're going to couple the trailer and we're going to see how much the stock suspension sags.
What we're going to do is, we're going to take that measurement and then we're going to fill the air bags that we have installed to see how much that's going to raise back to our factory suspension and our stock ride height.What we're going to go ahead and do here is measure from the ground. Keep in mind your results may vary depending on what tow vehicle you have. We're just using this as reference, a guide to show you. While our vehicle is unloaded and we're detached from the trailer, we're going to measure from the ground to the top center inside of our wheel well, 34 and a half inches. We're going to go to the front, take the same measurement.In the front, we're about right at 33 inches, so we have about an inch and a half difference.
Now we're going to go ahead and couple the trailer and retake these same measurements. From the ground to the top center of the wheel well is going to be about 33 and a half inches. Therefore, we dropped about an inch in the rear. From the ground to the top center of the wheel well again in the front, is going to be about 33 and a half inches. Overall, we went down an inch in the rear and we came up about a half an inch in the front.Offhand, these measurements may not seem like a lot to you, but you'd be surprised at what sort of effects this could have on your vehicle while you're out driving around.
Number one, our suspension in the front is obviously raised a little bit, this is going to mean a couple of different things. Number one, we're not going to have nearly as much stopping power, because we don't have as much weight on the front axle.Now in modern vehicles, say, about 60% of our stopping power is going to be on the front axle. When we take weight off that front axle, we're going to decrease our stopping power. In addition to the reduced stopping power, the raised front end is going to do a couple other things. It's going to point our headlights more towards the sky, which is going to reduce our visibility of the road and finally, last but not least, we're going to have some tire wear issues because the camber of our front tires is not correct with the weight lifted off of them.Therefore, we're going to have to replace our tires sooner because they're going to wear unevenly.
By putting more of a strain on the rear of our vehicle, our existing suspension components are going to wear out faster. We could experience a harsher ride and overall the tow vehicle won't feel as stable than it would unloaded. Now we're going to go ahead and put some air in our air springs, retake our measurements so we can show you the difference. Now we have our airbags filled, we have our trailer re-coupled, let's go ahead and take our same measurements that we took earlier.From the ground to the top inside edge of the wheel well, it looks we're about 34 and a quarter, not quite to 34 and a half inches, so we're about a quarter inch away from our factory ride height here at the rear. Let's go up to the front of the vehicle. If you remember, our factory ride height here with the trailer attached and our stock suspension was at 33 inches at the front, and we are back at 33 inches. We've actually came back to the factory ride height here at the front of the vehicle.Since we're back at the factory ride height or very close to it now, we're not going to have to worry about some of the issues we mentioned earlier about the headlight aim, the tire wear issues, or the decreased suspension longevity. Now that we've given you a visual of some of the measurements in the factory ride height, we went ahead and decreased all the air in the airbags again to the minimum five PSI pressure, and now we're going to take the vehicle on our two test courses we have at etrailer, the slalom course and the speed bump course.We're going to try to show you a representation of the ride quality when we have a load present with the airbags inflated and a load present without the airbags inflated. What we're going to do is, we have a couple of coolers in our hatch area here, not a terrible amount of weight, but enough to know it's back there. We're just taking our vehicle out on our test course now. As we can tell, without the airbags inflated, we are a little bouncy going over these speed bumps, as you would expect though.Yeah, it does feel like the vehicle is shifting around just a tiny bit side to side. Our steering isn't quite as responsive as it normally is. Now we're going to do some invasive maneuvers on our slalom course. Keep in mind it is wet here, so we are going to keep our speeds rather low. Again, we have a couple coolers in the hatch area here with our airbags deflated. Again, we can notice just a slight to slide rocking, more of a body roll if you will, while we're making these sharp turns here. I'm going to turn around, go the other way.Again, nothing real, real drastic, but we do sort of notice it a little bit, or at least I can anyhow. Yeah, a little bit of body roll, side to side. Now we go ahead, we went ahead and inflated our air springs. We put around 20 to 30 PSI in there and now we're going to leave the gear and the coolers in the back hatch here. We're going to go ahead and take our vehicle through our test course again, starting with our speed bump course.The suspension definitely feels a little bit firmer, but I don't feel as much body roll as we had the first time around. There's not as much jolting side to side. The steering is a little bit more responsive. Again, not a drastic, huge difference, but a minimal difference that we can still notice. Now let's go ahead and head on over to the slalom course and see the improvements over there. Now we're at the slalom course here. We're going to make some invasive maneuvers at speed, try to remain consistent with the speed of our initial run.I am noticing the steering's being a little bit more responsive. The weight is also not shifting around as much side to side, therefore we don't have as much body roll. These results are going to be the same whether we have heavy cargo in the rear of our hatch here or we're towing a trailer. The biggest difference I would have to say is just the weight transfer from side to side isn't severe with our airbags installed and inflated, therefore we don't have as much body roll.I would say that is probably the biggest takeaway of these Air Lift Air Springs here. Now they're going to help us do two things. They're going to help us, one, if we're towing a heavy load, number two, they're going to help us if we're hauling a heavy load. However, the stock suspension isn't necessarily designed to max out the payload or to max out our trailer weight ratings every time it's on the road, so that's where our suspension enhancements come into place.Again, they're going to do an excellent job helping to stabilize the heavy load, so we don't have that uneven, that harsh ride quality we would if we we're maxing out the factory suspension. Although there aren't any other options for this vehicle, I actually prefer airbags because the main reason is they're adjustable. What this means is, we can adjust the pressure inside the airbags, so we get the perfect level of support and comfort for any given load we may have at a time.The Air Lift Air Helper Springs can be installed in one of two ways, we can install them as a single pass system, which essentially means that we're going to have one inflation port, which is going to inflate both airbags. Now this is going to be the most common setup and what I recommend using. However, there is another option as well, called a Dual Path System Install. Essentially this means we're going to have two inflation ports, one to each of the air bags, so we can adjust the air bags.We can adjust the PSI in each airbag's different, so we have different amount of PSI and that's essentially going to be good for trailers if they're heavier on one side or we have more cargo in one side of the vehicle than the other. Our Air Lift Air Helper Springs here are going to have a 1000 pound weight capacity. However, keep in mind this isn't going to increase either the payload or the towing capacity of our Jeep.In regards to the fill rating of our airbags, this can be anywhere from five PSI, which is the minimum to 30 PSI, which is a maximum. However, again, the major feature, the major draw of airbags is that you can adjust the pressure for any given load you may have. Just make sure it never falls below five PSI or above 30 PSI. We need to keep in mind that with our air lift airbags, we are going to require access to an external air compressor in order to inflate the airbags.Now, if you're only going to be using the airbags every so often, then we can probably just suffice with finding an external air compressor, like at a gas station. However, if you find yourself to be towing or hauling heavy loads frequently, it's definitely going to benefit you to consider an onboard air compressor, like this Air Lift Wireless Bluetooth Air Compressor that we have here. This is actually going to be an excellent option for this vehicle because we don't have to run any airlines or wires into the cab, and the compressor is sized appropriately for our air springs. Now that we've showed you some of the benefits and features of our air springs here, that's going to do it today for the look at our Air Lift 1000 Air Helper Springs.
Customer Reviews
Air Lift 1000 Air Helper Springs for Coil Springs - Rear - AL60807
Average Customer Rating: 4.7 out of 5 stars (1090 Customer Reviews)
1,000-lb Capacity. Upgrade your vehicle's rear coil spring suspension with this kit. Molded polyurethane air springs fit inside your existing coil springs for added support when hauling heavy loads. Improves handling, braking, and overall ride.by: Robert09/04/2022
They work great. I’ve used them to align my boat, a utility trailer and the wheelchair carrier for my wife. Has improved the ride and gas mileage by making the combinations more aero Dynamic. I would purchase again and recommend them to others


by: Mark06/25/2022
Product arrived promptly. Very simple idea, but absolutely difficult as H&¿¿to install. Trying to squeeze the folded air bag between the coil Springs was an absolute nightmare. Maybe some springs on some vehicles have a larger spacing between the coil,but a 2019 Kia Sorento does not. It took almost 6hrs to install both sides. One trick that did help was to use a little silicone spray on the air bag where it was jammed into the coil spring. This helped make the bag slippery so it passed between the coil spring. Just don't get it all over the air bag or it will be too slippery to hold onto as you push it into place. The hose clamps are really a poor design, awkward to squeeze with pliers as you position them into place. So far bags appear to be holding air pressure. Time will tell has to how durable and dependable they will be.I installed them to assist with towing my camper and help reduce the squatting when towing.


by: Todd08/03/2023
Reviewing the Air Lift 1000 kit 60860 for Kia/Hyundai SUV
Installed in a 2017 KIA Sorento LX. Like many other reviews claim, this was not easy to install although the factory video makes it look so, so simple. I followed the instructions for the first bag, it took me 2 and ½ hours to get it inside the spring coil. I used an exacto knife for cutting the hole, which worked very well. Not having a spoon type tire iron, I eventually settled on the handle of a large crescent wrench. After inserting the bag ½ way in, using the wrench to push on the part already in the spring brought the rest of the bag further in. Eventually I finally got the first bag inserted although it was twisted. Inflating the bag straightened it out. Starting on the second bag, I noticed it was much more pliable. It had been sitting in the Florida sun for the past 2 ½ hours. I folded it down as instructed, then folded it in ½ lengthwise and used zip ties to secure it. After sitting in the hot sun for another hour while I hydrated, it only took me 10 minutes to get the 2nd bag inserted and needed no other tools to assist. Carefully snipped the zip ties off and it popped into place. Running the air lines was simple enough. The hose clamps are very fragile, be patient, be careful or they will break.
Overall I am quite pleased with the performance of the bags. They make a big difference in how the KIA rides when towing. They hold pressure and are easy to inflate & deflate. I use a bicycle tire pump as I have no need to modify the pressure in route and didn’t see the need to spend the money on a remote control inflation system.


by: Aaron07/27/2023
Installed this kit on our 08' sienna awd the day before a road trip. Install went fairly smooth. It did take a couple of attempts to get the air bags stuffed into the coil springs. Routed both airlines individually and mounted on lower bumper black trim just above the hitch. Held air at 35psi overnight, deflated to 25psi with cargo and hit the road. All seems well and the van handles better loaded.
Have to echo other positive reviews of this product. Makes the sienna even more versatile, and it is both affordable and a moderate diy project for shadetrees like me


by: Jim10/04/2022
Package arrived damaged,no parts missing or damaged, can't comment on product not installed at this time.
Jim


by: Frank 05/01/2023
its been a year of using the lift kit on the Jeep Wrangler Rubi (4door). no issues. did replace the clips with tighter fitting clips.
not much else to say. works as advertised.
by: Kurt B05/08/2024
Getting the tubing completely over the plastic barbed tee fittings is difficult at best without damaging the fittings. The bags will not hold pressure for more than a day. The metal barded fittings are much easier to use & get the tube seated properly. Recommend NOT using the plastic tee fittings.
Getting the bags inside the springs is a test of patience, flexibility, hand & arm strength within a confined area. This is not a quick installation AND make sure you're in the shade because you'll be sweating enough without the help of the sun.
Once everything was installed & inflated, the ride without the trailer was noticeably better & with the trailer, the bag end sag was completely eliminated. FYI, the ride of the KIA without the air bags & trailer is already very nice.
by: Matthew05/02/2024
These air bags are very difficult to get into the coil spring. You must disconnect the shock absorbers and disconnect the brake line bracket. Also lubricant of some sort was most helpful. Connect the air lines while coil springs are fully extended. Otherwise you'll never get them in. Once they're inside some compressed air is helpful to blow up the bag. Once installed work quite well.
by: Eric 04/24/2024
Product does exactly what it’s supposed to do. Install was fairly easy. Hardest part was getting the bags in the springs but it wasn’t terribly difficult. I tow a 3000 pound pop up camper with my jeep wrangler JL unlimited and it levels out my load no problem
by: Brian 04/11/2024
Put these on 07 tahoe. I pull a camper and put 400lbs of tools in back of tahoe. With just the tools I noticed it help put more weight on front wheels. I have not pulled camper yet but with just the minimum 5lbs of pressure it helped with the tools.
It took me about 4 hrs to install by myself on the ground. The hardest part was getting it pushed into the coil springs. I ended up using a ratchet strap to help push it in. It was fun trying to get the hose connected afterward, could not see, had to feel and take a picture to make sure it was fully seated.
by: Tom03/17/2024
Pretty cool product, and it works! The instructions are lacking, but some videos and research got me through it. I have a 1st generation Toyota Sequoia that I have made into a camping rig with a water tank. It caused the back to ride heavy and made highway corners a bit scary with body roll. I first added Sumo Bump stops that helped. But these actually made it ride normal when fully loaded with bikes, water, and camping gear. Worth the money. Install is not bad, but the instructions are. Jack your rig from the frame so suspension is hanging free. Take the tire off. Undo the single bolt bracket for the brake line in front of rear tire. Remove the bottom bolt from the shock. Remove the bump stop (not required but easy to do and gives you more room. Use a small hydraulics jack to set on top of rear axle and jack against the frame pushing the rear axle down. The springs are easily removed. Take the rubber numb stop
Inside the spring out and cut it at the top notch or indent. Remove burrs from the inside of the spring where the airlift will sit. This is not required but a smooth surface for the rubber is good. The instructions show the airline pointing down toward axle. This is wrong. Route the airline through the top. No need for drilling as the instructions indicate or using the cutout. The rest is putting it back together and it’s easy. I put my air valves behind the mud flaps.
by: Preston02/16/2024
My vehicle is a 2002 Chevy Tahoe. Installation of the Air Helper Springs was fairly simple. Getting them inside the factory springs is a bit of a bitch, but doable. The ride while pulling my travel trailer was bouncy at 15psi. Not what I was going for. Unloaded, I kept 5psi in the helper springs and it was fine.
I developed a clunking in the rear end about 8 months after installation. I discovered that the lower bolts on my shocks were loose. I'm assuming that the decreased load on the shocks allowed play in the frame mount and therefore allowed the bolt to loosen. Easy fix, but something to be aware of. Overall, the air helpers work, but next purchase I'll be going for a system with its own air compressor.
by: Scott W.04/01/2017
Installation was super quick and easy in my home garage. The hardest part was finding a way to jack the truck high enough to hang the rear axle. My test was 25 bags of mulch. The before installation picture shows the rear squat. The after picture is of the exact same load with 30psi in the air bags. Super happy with the results. The ride is much better with a load in the back. Can't wait to hook up my camper to see how much better the ride is on a long trip.


by: Vinny in Marrero La.03/18/2023
Installed the airlift 1000 system four days ago. Didn’t have access to a car lift so I installed on the ground by jacking up and installing one side at a time. Had plenty room to work with. Routed air line up the driver side rear corner and in through my Odyssey’s rear taillight into my rear storage compartment inside the vehicle. I made a small brass manifold with a 0 to 60 gauge so I can easily monitor and manage pressure. Gauges don’t lie! So far, it’s perfect! I’ll be towing a can-am Spyder on a trailer in April. Can’t wait to put this system to work.


by: Ronald Chan06/04/2023
2022 Mitsubishi Outlander Gasoline 2.5L
(In fact, a Nissan Rogue with Mitsubishi outlook.
Easy to install. Finished in an hour. Watch some youtube video installation.
Better keep both air bags not linked for better turning.


by: Chuck02/07/2024
Cannot be beat for the value and performance-
Towing a 7K lb boat with Independent suspension on the Toyota Sequoiq, this eliminated the sag and actually rides better inflated even without the trailer weight. Installation is easy and straight forward. Jack the vehicle up and use zip ties to make the bags smaller and tighter to slide inbetween the springs, then cut ties!
by: Jon11/13/2020
Installed on 15 Jetta tdi. I Removed wheel, then coil spring, (1 side at a time) folded bag like hot dog bun and installed into coil spring upside down (fitting facing down) cause it would have hit otherwise. Reinstalled, ran lines, mounted fill valve in bottom part of rear bumper and filled. It’s been a year and is still working perfectly.


by: John10/16/2022
I needed a little more clearance for my rear cargo carrier. This keeps it from draging when it is heavily loaded (such as an electric wheelchair). My son installed the air lifters with no trouble. He was able to run the air line up though the rear finder to my gas fillup so that it could not be seen until you opened the gas fill door. The ride is a little rougher, but they have held up well over the past year.
by: William 05/01/2024
Good product. After one year still going strong on my Pathfinder and keeping my boat trailer up where it belongs.
by: Hieu02/20/2024
This product is great! It definitely support the load when towing a trailer. Also, there were several times my truck lost pressure from my hydraulic shocks which the Air lift 1000 saved from bottoming out. Not a solution but definitely save me at the time. I have a 99 Lexus LX 470.
by: CKM10/10/2021
2020 Ford Explorer install. These are well made in the USA. Being robustly made, they do not fold into a "hot dog bun" shape as indicated in the instructions. The Hulk might but I could not. I was able to get them into a "horizontal stomped beer can" shape which I made work. It took about an hour for the first one and less for the second one. I used a plastic dead blow handle to assist since the hammer end allowed for a good handle as I pushed with the actual handle. I have dual exhausts so I routed up through the body rails above the mufflers. I found holes in the A-arm, just rear of the middle hole, that allowed for the air line to be routed back and up. I didn't go forward as the directions illustrated since I would it would not help my situation. Product - A+ Easy of Install - B-


by: Stephen07/23/2020
Installed on my 2015 Honda Odyssey (installed for 1 year now) and they work wonderfully! Primary use-case was to help when fully loaded for a road trip including 4-5 bikes on the hitch rack. I used to clench my cheeks whenever I would see a slight dip in the road under these conditions because the stock suspension would just bounce off the bump stops and oscillate for a bit. I would also drag the bike tires when pulling out of parking lots because the rear sagged so much. With the airbags installed, rear ride height is much improved and LOVE hitting those dips in the road because they just get soaked up! It's amazing!
Installation wasn't too bad, but I did get some squeaking for the first several months as the airbags do rub up against the springs. The only thing I still want to change is to add either a valve to isolate Right from Left or just plumb the two lines separately in order to increase roll stiffness.
I don't feel like the on-board pumps would be necessary because even when I leave them fully inflated to 35 PSI, the ride is not uncomfortably stiff. Great product.


by: Erik04/07/2024
Don't know why I waited this long. When the vehicle is overloaded for vacation and we are towing a boat, this makes everything right!
by: Tim 02/04/2024
Easy, straight forward installation. Looking for flexibility to avoid rear spring sag when pulling trailer and carrying loads. I'm happy I went with Air Lift and of course etrailer. Was very impressed with etrailer's outreach and the quick shipping and delivery.
by: Tom 02/28/2024
They are great for assisting the load on my suburban, but need to be inflated before doing so, especially with a heavy load. I plan on going with airbags mounted on the axle when these wear out.
25
1088
Show More Reviews
See what our Experts say about this Air Lift Vehicle Suspension
- Suspension Enhancement Recommendation for a 2004 Nissan Pathfinder ArmadaFor your 2004 Nissan Pathfinder Armada I recommend going with the Firestone Coil-Rite system # F4150. I have included a link to the installation details for you to view. Firestone makes a good quality suspension enhancement system and they also make the air bags for Air Lift. You can install the system as is and use your own air compressor or one at a gas station to fill the bags. Or you can get Level Command II kit, # F2158, which will allow you to add or remove air from the cab of the...
view full answer...
Info for this part was:

Expert Research:
Michael H

Updated by:
Tricia G

Updated by:
Mary K

Updated by:
Wilson B

Updated by:
Alex H
At etrailer.com we provide the best information available about the products we sell. We take the quality of our information seriously so that you can get the right part the first time. Let us know if anything is missing or if you have any questions.
Product Experts Available Now!
Call 1-800-940-8924
Thank you! Your comment has been submitted successfully. You should be able to view your question/comment here within a few days.
Error submitting comment. Please try again momentarily.